Fine tuning the image alignment
“I see ghosts (faint double images).”
If the images are aligned properly, the focal length is correct and barrel distortion is corrected but you still see faint double images, you need to perform alignment fine tuning to make local corrections in the image alignment.
To manually control fine tuning of the image alignment, you must first open the overlap region between the images. Then you use the mouse and the controls on the Overlap region dialog box to draw, edit and remove fine tuning tiles.
 Why fine tune?
Opening an overlap region (alignment fine tuning)
An example
Judging the fine tuning
Removing tiles
Drawing new tiles
Good places to draw tiles
Editing tiles
The Panorama Factory fills in the gaps
Why fine tune?
When The Panorama Factory aligns adjacent images, it finds the offset that minimizes the differences between the images in the overlap region. It is rarely possible to align the images perfectly throughout the entire overlap region. When the images are not perfectly aligned, some portions of the overlap region will show double images called ghosts. The Fine tune command (Image menu) analyzes overlap region and makes local adjustments in an attempt to remove the ghosts.
Some possible sources of ghosts:
· Image distortions introduced by the camera lens.
· Imperfect camera alignment when the pictures were taken.
· Image distortions introduced by the scanner (assuming you didn’t use a digital camera).
· Improper setting for the focal length.
 See “Capturing your images” in Chapter 2, “Getting started” for
suggestions about how to minimize ghosts.
See “Capturing your images” in Chapter 2, “Getting started” for
suggestions about how to minimize ghosts.
You can use the Fine tune command in two ways. If you use it when the stitched image is in the current image pane, The Panorama Factory will fine tune all overlap regions.
To fine tune one overlap region at a time, you must use the Fine tune command when that overlap region is open. To open an overlap region, click the handle at the top or bottom edge of an overlap outline or double-click anywhere on the outline when the stitched image is showing. Once the overlap region is open, you can use the Fine tune command to automatically fine tune the overlap region or fine tune manually.
top
Opening an overlap region (alignment fine tuning)
To open the overlap region between the two images:
1. Locate the stitched image in the upper thumbnail array.
2. Double-click this image to make it the current image.
3. You'll see red outlines indicating the overlap regions (see “Classic step 2 – Stitch the images into a panorama” in Chapter 4, “Using the Classic interface, step by step” for an example).
4. Locate the overlap region that is improperly aligned.
5. Open the overlap region by clicking the handle at the top or bottom edge or double-clicking anywhere on the outline.
Four different overlap tasks can be performed with the Overlap region dialog box. The fine tuning task provides the ability to make small-scale adjustments to correct for local mismatches in the image alignment.
When you select the fine tuning task, The Panorama Factory displays any fine tuning tiles that have already been added to the image and allows you to draw new tiles and edit existing tiles.
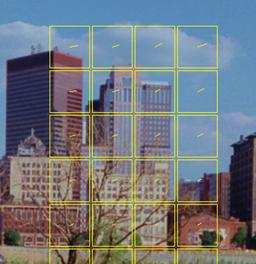
If you didn’t use automatic fine tuning or if you cleared it to correct overall alignment, you may want to select the Auto fine tune button to run the Fine tune command now. The Fine tune command tiles the overlap region and adjusts the alignment within each tile independently. It displays a small rectangle representing each fine tuning tile. A line radiating from the center of the tile shows the direction and magnitude of the adjustment. The Panorama Factory may abandon some tiles if it cannot achieve a reasonable alignment.
Low contrast images and images that lack detail are particularly
challenging for The Panorama Factory. Images like these often require more
manual adjustment than ones that are rich in high-contrast edges. The article “A
fine tuning challenge” at
www.panoramafactory.com/finetuning/finetuning.html
examines a particularly challenging set of images as a way to illustrate some potential difficulties with fine tuning and how to avoid them.
top
An example
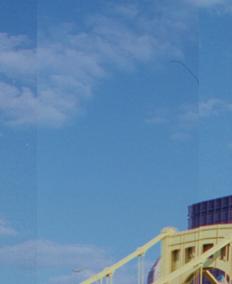
Here’s an example of an overlap region with ghosting and the fine tuned result.

top
Judging the fine tuning
You can judge how good a job The Panorama Factory did by looking at the consistency or inconsistency of the adjustments. The following example shows how The Panorama Factory can get confused in regions that have too little detail.

top
Removing tiles
 To remove
the inconsistently adjusted tiles, you must select the tiles and then click the
delete button on the toolbar, press the DELETE key, or select the Delete
selected command from the Edit menu.
To remove
the inconsistently adjusted tiles, you must select the tiles and then click the
delete button on the toolbar, press the DELETE key, or select the Delete
selected command from the Edit menu.
You can select individual tiles by clicking them or hold the SHIFT key to click-drag a selection rectangle around a group of tiles.
See Chapter 8, “Working with image decorations” for more information about selecting and deleting tiles.
top
Drawing new tiles
 You can draw new tiles by click-dragging when away from
existing tiles. The cursor shows an arrow with a small rectangle to indicate
that you can draw a new tile.
You can draw new tiles by click-dragging when away from
existing tiles. The cursor shows an arrow with a small rectangle to indicate
that you can draw a new tile.
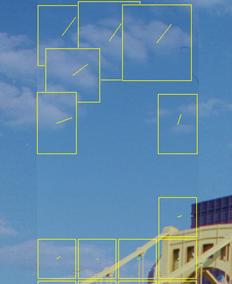
In the example, the clouds have offsets that are large enough to cause The Panorama Factory to abandon them (probably because the clouds moved between the time the first and second images were made). By drawing larger tiles, The Panorama Factory gets enough context to compute the correct adjustment.
top
Good places to draw tiles
Sometimes you’ll have an overlap region that is so poor that you have to draw all the fine tuning tiles yourself. The best places to draw overlap tiles are where there are strong horizontal and vertical elements, e.g. a corner of a building or where sidewalk cracks intersect.
top
Editing tiles
When you draw a tile, The Panorama Factory tries to determine
the alignment adjustment. You may disagree with its alignment. In this case,
there are two strategies you can follow.


 You can edit
the tile to stretch or shrink it and hope that The Panorama Factory does a
better job on the enlarged or reduced tile. To edit the tile, move the cursor
over a side or corner of the tile. The cursor changes to indicate that a
dragging operation will change the size of the tile.
You can edit
the tile to stretch or shrink it and hope that The Panorama Factory does a
better job on the enlarged or reduced tile. To edit the tile, move the cursor
over a side or corner of the tile. The cursor changes to indicate that a
dragging operation will change the size of the tile.
 If you can’t convince The Panorama Factory to make the right
adjustment you can adjust the tile using the mouse or keyboard. To adjust the
tile with the mouse, move the mouse to the center of the tile. The mouse will
change to show that you can use it to adjust the tile.
If you can’t convince The Panorama Factory to make the right
adjustment you can adjust the tile using the mouse or keyboard. To adjust the
tile with the mouse, move the mouse to the center of the tile. The mouse will
change to show that you can use it to adjust the tile.
Click-dragging adjusts the relative positions of the images within the fine tuning tile.
To adjust the tile with the keyboard, use these steps:
1. Click an edge of the tile to select it.
2. While the tile is highlighted, use the LEFTARROW, RIGHTARROW, UPARROW and DOWNARROW keys to control the adjustment one pixel at a time. Hold the SHIFT key to change the adjustment 10 pixels at a time. When you get close, nudge the adjustment around one pixel at a time until you get the sharpest image in the middle of the tile.
If you click on the Overlap
region dialog box while trying to adjust the tiles, the mouse movements
and arrow keys will be sent to that dialog box instead of being used to adjust
the tiles. In this situation, you must click on the large image so that the
mouse movements and arrow keys will be sent to the image for the purpose of
adjusting the tiles.
top
The Panorama Factory fills in the gaps
The Panorama Factory will fill in the adjustment between tiles by interpolating and extrapolating from the surrounding adjustments. This means that a small number of tiles may be enough in regions where the adjustment changes slowly, but more tiles are needed where the adjustment changes rapidly.
top