Classic step 2 – Stitch the images into a panorama
 Now use the
Stitch
command or the Stitch 360 command (New image
menu) to form the imported images into a panoramic image.
Now use the
Stitch
command or the Stitch 360 command (New image
menu) to form the imported images into a panoramic image.
 If you
intend to convert your panorama into an immersive virtual reality file (e.g.
IVR or QTVR), you must use the Stitch 360 command.
If you
intend to convert your panorama into an immersive virtual reality file (e.g.
IVR or QTVR), you must use the Stitch 360 command.
Before stitching, you should probably check the Camera properties dialog box, Alignment properties dialog box, Blending properties dialog box and Fine tuning properties dialog box to make sure they are set they way you want them.
By default, The Panorama Factory will attempt to stitch all of the trimmed images. If there are no trimmed images, The Panorama Factory will attempt to stitch all of the imported images. You may, however, select a subset of the computed thumbnails or imported thumbnails to stitch.
The Stitch command and the Stitch 360 command are available only when you are not viewing a panoramic image.
NOTE: All images to be stitched must have the same width and height.
When stitching is completed, The Panorama Factory adds the stitched image to the end of the computed thumbnails list and selects it as the current image. It displays outlines superimposed on the stitched image to indicate the image overlap regions:
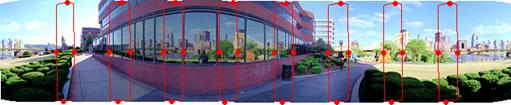
If you use the Stitch 360 command, the same image appears at both ends of the panorama to signify that this is a circular panorama. The Panorama Factory hatches the duplicated portions at the left and right ends of the panorama. This provides a bit of flexibility when using the cropping tool to compose the cropped panorama.

(Note the scalloping effect at the tops and bottoms of the image. This is the results of the image warping that is required to match adjacent images.)
Opening overlap regions
When you place the cursor over various parts of an overlap outline it changes to show you what editing actions are possible:
|
This cursor
|
Means this Indicates that the cursor is over a handle (red dot) on
the left or right border of the outline. Dragging left or right changes the
width of the overlap outline. This is used to exclude portions of one image
or the other from the blend region. You cannot enlarge the outline beyond the
boundaries of the image overlap. If you try, the edges will snap back. |
|
|
Indicates that the cursor is over the left or right border of an overlap outline. Dragging up or down edits the shape of the outline. You can use this to exclude portions of one image or the other from the blend region. You cannot enlarge the outline beyond the boundaries of the image overlap. If you try, the edges will snap back. Double-clicking when this cursor is active opens the overlap region for manual fine tuning (removal of ghost images). |
|
|
Indicates that the cursor is over a handle (red dot) on the the top or bottom border of an overlap outline. Clicking opens the overlap region for manual fine tuning (removal of ghost images). |


Stitching takes a long time, so when it completes you should probably save again.