Adjusting exposure matching and brightness falloff
This section covers two tasks related to image brightness in overlap regions.
1. The Panorama Factory tries to adjust the relative brightness of overlapping pairs of images. Sometimes its automatic adjustment produces undesirable changes in brightness.
If you still see abrupt changes in brightness even after you have enabled automatic exposure matching, you may need to adjust the exposure matching between image pairs yourself.
2. With some cameras and some lenses, image brightness decreases toward the edges and corners of the images. When the images are overlapped, the dark areas reinforce once another, creating dark vertical bands.
Although The Panorama Factory can perform an automatic correction for brightness falloff, in some situations you may need to adjust the brightness falloff correction yourself.
To manually control exposure matching and brightness falloff correction, you must first open the overlap region between the images. Then you use the mouse and the controls on the Overlap region dialog box to adjust these corrections.
 Opening an overlap region (adjusting exposure)
Adjusting exposure matching
Correcting brightness falloff
Opening an overlap region (adjusting exposure)
To open the overlap region between the two images:
1. Locate the stitched image in the upper thumbnail array.
2. Double-click this image to make it the current image.
3. You'll see red outlines indicating the overlap regions (see “Classic step 2 – Stitch the images into a panorama” in Chapter 4, “Using the Classic interface, step by step”).
4. Locate the overlap region that is improperly aligned.
5. Open the overlap region by clicking the handle at the top or bottom edge or double-clicking anywhere on the outline.
Four different overlap tasks can be performed with the Overlap region dialog box. The fine tuning task provides the ability to adjust exposure matching between one image and the next and the brightness falloff correction.
While the exposure and falloff correction controls are active, The Panorama Factory displays a preview rectangle on the current image. The Panorama Factory interactively updates the interior of the preview rectangle as you make changes to the settings.
When you place the cursor over the various parts of the
preview rectangle it changes to show you what editing actions are possible:
|
This cursor |
Means this |
|
|
Indicates that the cursor is over one of the sides or corners of the preview rectangle. Dragging changes the size of the rectangle. |
|
|
Indicates that the cursor is not over any part of the preview rectangle. Dragging draws a new preview rectangle. |


Fine tuning tiles are not displayed while the exposure matching controls are active. They are redrawn when you deactivate the exposure matching controls.
top
Adjusting exposure matching
To adjust the relative brightness of the overlapping images, begin by drawing the preview rectangle so that it includes both edges of the overlap region. As you adjust the exposure matching, you should look at the way the edges of the overlap region match or mismatch with the images themselves.
Use the <--- Brightness ---> slider to adjust the exposure matching between adjacent images. Moving the slider to the left increases the brightness of the left hand image (or decreases the brightness of the right hand image). Moving the slider to the right increases the brightness of the right hand image (or decreases the brightness of the left hand image).
 Manual adjustment of the exposure matching is reset automatically by
restitching the panorama.
Manual adjustment of the exposure matching is reset automatically by
restitching the panorama.
top
Correcting brightness falloff
It is usually best to use the automatic falloff correction setting on Wizard step 3/9 – Describe your camera or the Camera properties dialog box (Tools menu). Sometimes, however, you need to adjust the falloff correction yourself. This section describes how to use the falloff correction controls on the Overlap region dialog box. You can also read this section to see an example of what brightness falloff looks like.
The same falloff correction setting applies to all images in your
panorama. After adjusting the setting, you should check the other overlap
regions to be sure it works well for your entire panorama.
Our example uses three images with visible brightness falloff in the corners. These photographs were made with a Pentax Super Program 35mm film camera with a 28-80mm zoom lens set to 28mm and an aperture setting of f3.5. This camera/lens combination actually exhibits this degree of brightness falloff. Many current digital camera models also suffer from a significant amount of brightness falloff.
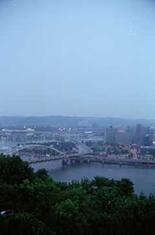
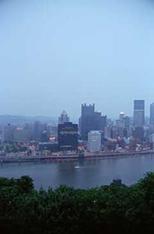

Brightness falloff becomes a problem when the overlap between one image and the next is less than 50%. When the overlap is small enough that the dark areas overlap, they reinforce one another, creating dark vertical bands on the stitched image.

The automatic correction for brightness falloff can usually do a good job of compensating, but occasionally you will need to adjust the settings yourself. You start by opening an overlap region in the stitched panorama.
The Panorama Factory displays a preview rectangle on the current image. You should draw the preview rectangle so that it covers the corners of the overlap region. The following image shows the overlap region with no falloff correction applied (amount is zero).
As you adjust the falloff correction, you should look at the way the edges of the overlap region match or mismatch with the images themselves.
The dark arrows indicate where you should look as you adjust the falloff correction.

Begin by adjusting the Amount setting under Correct brightness falloff. The following image shows the effect of increasing Amount. The bright arrows indicate how the corners of the overlap are brightened too much.

Reduce Amount until the brightness is just about matched at the extreme corners of the overlap.

Next, adjust the Size of the correction. When Size is too small, the corners (brighter arrows) are bright and the sides (darker arrows) are too dark.

Increasing Size too much makes the sides of the overlap too bright even in the middle of the overlap.
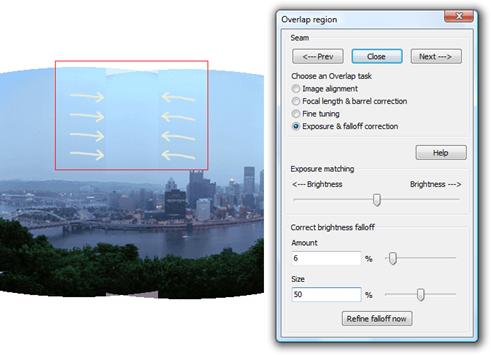
When Amount and Size are just right, the brightness is well matched all along the edges of the overlap region.

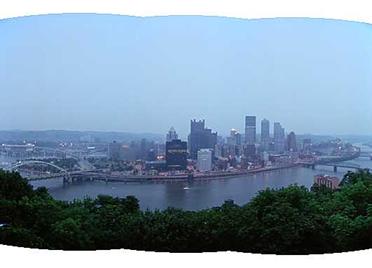
Amount and Size interact, so it is often necessary to go back and forth between the two settings until you get a good result. The following image shows the final, corrected panorama.
top