Wizard step 6/9 – Place stitching points
In this step you place stitching points in corresponding positions on overlapping images. This step is used only for manual or semi-automatic stitching. The Panorama Factory skips this step for fully automatic stitching. In document stitching, this is Wizard step 4/7.
For manual stitching, you have to place stitching points on all pairs of images so that The Panorama Factory can determine the tilt angles for each picture. For semi-automatic stitching, you place stitching points on one or more pairs of images. The Panorama Factory assumes that the tilt angles are the same for all pictures and applies the same values to image pairs that do not contain stitching points.
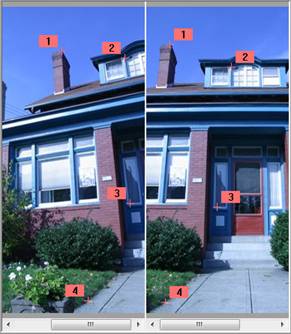
To use this Wizard step, you select a pair or images from the Images list. The left and right images of the pair are displayed in a split screen view. To place a stitching point, click on one of the images. Then click in the corresponding location in the other image. The Panorama Factory will try to automatically center the second stitching point on the corresponding image feature if the zoom scale is less than 500%. If you disagree with the automatic centering, you can click and drag the stitching point to the correct position.
It usually best to make the initial stitching point placement with the images zoomed to show the entire overlap region of the two images. We suggest using the Fit height on screen command (Image menu).
To help you place the points, you can hold the CTRL+SHIFT (Windows) or COMMAND+SHIFT (Mac) keys to momentarily zoom the image to 500%. When you release the keys, the image will return to the previous zoom scale. To precisely position a stitching point using this method, start by placing the point in one of the images. Then move the mouse to the corresponding position in the other image and hold CTRL+SHIFT (Windows) or COMMAND+SHIFT (Mac) while you place the corresponding point using 500% zoom.
You may adjust the positions of the stitching points using the keyboard arrow. To adjust a point with the keyboard, use these steps:
1. Click a stitching point to select it.
2. While the stitching point is highlighted, use the LEFTARROW, RIGHTARROW, UPARROW and DOWNARROW keys to move it one pixel at a time. Hold the SHIFT key to move it 10 pixels at a time.
After placing several stitching points, we recommend you review their positions. To review and precisely adjust an existing stitching point, select the point by clicking on its number in the Point list. Then hold CTRL+SHIFT (Windows) or COMMAND+SHIFT (Mac) while you adjust its position in both images using 500% zoom.
To jump to particular stitching point, click on its number in the Point list. The split screen view will scroll to show the selected stitching point in each image. If you select a group of stitching points in the Point list, the split screen view will scroll and zoom to show the group of stitching points in each image.
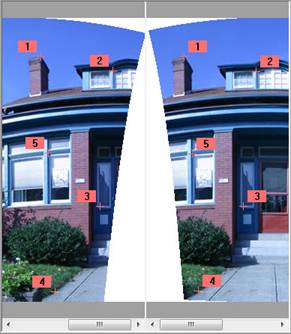
 For best results, it is important to spread your points around the
overlap region of the two images. If possible, do not place them in a cluster
in one area of the picture. For example, try to place four points as close as
possible to each corner of the overlap. The position of the fifth is not so
critical, but a central point is a good spot.
For best results, it is important to spread your points around the
overlap region of the two images. If possible, do not place them in a cluster
in one area of the picture. For example, try to place four points as close as
possible to each corner of the overlap. The position of the fifth is not so
critical, but a central point is a good spot.
The Panorama Factory usually requires 5 stitching points to determine the relationship between the pair of images. If it successful, it displays a checkmark in the Images list and adjusts the image warping to agree with the stitching points.
Sometimes you may need to place more than 5 stitching points to get a checkmark. If you cannot get a checkmark by placing additional stitching points, there may be a bad point that you should move or delete instead.
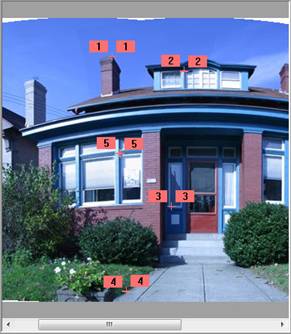
There are several methods you can use to judge the quality of the stitching point placement. You can review the placement at 100% zoom (or larger) in Split screen (edit points) view. Or, you can select Overlay view to show the images superimposed upon each other.
After an image has a checkmark, The Panorama Factory evaluates the quality of the stitching point match and displays a colored dot in the Point list to indicate the results of its evaluation:
 The match quality is
excellent.
The match quality is
excellent.
 The match quality is
good.
The match quality is
good.
 The match quality is
acceptable.
The match quality is
acceptable.
 The match quality is
poor.
The match quality is
poor.
The color of the worst stitching point in each image is also shown in the Images list. If you have a red dot, we recommend you carefully examine all stitching points on the particular image pair. Often The Panorama Factory correctly identifies the incorrect stitching point with a red dot, but occasionally the position of a different stitching point must be corrected to remove the red dot.
For hand held panoramas or with a tripod when the camera’s nodal
point is incorrectly positioned, parallax differences between one image and the
next can make it difficult for The Panorama Factory to get an acceptable
match. When this happens, we recommend placing the stitching points on distant
objects in the view, if possible. Differences in distance exaggerate the
effect of parallax, so using distant objects can reduce the effect.
Even with hand held photographs, the manual stitching method can deliver excellent results if you are able to place the stitching points properly.
You may advance to the next Wizard step when you have obtained checkmarks on all images for manual stitching or on at least one image for semi-automatic stitching. If you’re satisfied with the stitching point placement, press the Next> button to advance to the next step of the Wizard.