Classic step 4 – Crop the stitched image
 Now use the Crop command (New
image menu) to compose the image.
Now use the Crop command (New
image menu) to compose the image.
Use this command to crop the current image. The Panorama Factory displays a cropping rectangle superimposed on the current image and displays the modeless Crop image dialog box.
When you approve the cropping, The Panorama Factory retains the portion of the image within the rectangle, discarding the exterior portions. The cropping rectangle shows a horizontal line called the horizon line drawn across its middle. You use this line to judge whether the cropping rectangle is parallel to the actual horizon in the panorama.

For stitched images, the default cropping rectangle is set to include the maximum extent of image (excluding the scalloped top and bottom). The horizon line parallels the average rise or fall in the image from end to end.
The horizon line also indicates the zero tilt angle for Perspective cropping and for VR image export. It’s important not to change the location of the horizon line if you plan to use either of these features. Moving the horizon line usually produces unexpected results.
For circular panoramas created with the Stitch 360 command (New image menu), the ends of the default crop region are set so that the lefthand and righthand edges of the cropped result will match seamlessly. This is important for VR image viewers.
 Using the cropping rectangle
Cropping circular panoramas
Perspective cropping
Approve
Using the cropping rectangle
The cropping rectangle is used to simultaneously crop and rotate the image. You use the horizon line to set the rotation. You drag and rotate the horizon line until it is parallel to the horizon in your image. If you are making a 360 degree panorama it’s even easier—you just drag the lefthand and righthand horizon line intersections onto the same feature at the left and right sides of the image. Once you have the horizon line parallel to the image’s horizon, you stretch the four sides of the cropping rectangle to enclose the portion of the image that you want to keep.
When you place the cursor over the various parts of the
cropping rectangle it changes to show you what editing actions are possible:
|
|
Means this |
|
|
Indicates that the cursor is over one of the vertical sides of the cropping rectangle or over the midline of a perspective cropping rectangle. Dragging one of the size changes the width of the rectangle without affecting its height or orientation. Dragging the midline affects the shape of the perspective cropping rectangle. For circular panoramas, dragging moves the rectangle without changing its width. To change the width, hold the ALT key (Windows) or OPTION key (Mac) key while this cursor is showing. |
|
This cursor |
Means this |
|
|
Indicates that the cursor is over the top or bottom or the horizon line of the cropping orientation. Dragging the top or bottom changes the height of the rectangle without affecting its width or orientation. Dragging the horizon line repositions it without affecting the rectangle’s size or orientation. |
|
|
Indicates that the cursor is over one of the corners of the cropping rectangle. Dragging changes the width and height of the rectangle without affecting its orientation. For circular panoramas, dragging changes the rectangle's height and moves it left and right without changing its width. To change the width, hold the ALT key (Windows) or OPTION key (Mac) key while this cursor is showing. |
|
|
Indicates that the cursor is over the intersection of the horizon line with the left or right side of the cropping rectangle. Dragging repositions the intersection point and also changes the width and orientation of the cropping rectangle. For circular panoramas, dragging moves the rectangle without changing its width or orientation. To change the width and orientation, hold the ALT key (Windows) or OPTION key (Mac) key while this cursor is showing. |
|
|
Indicates that the cursor is not over any part of the cropping rectangle. Dragging draws a new cropping rectangle. This cursor appears only when there is no cropping rectangle present. If you have a cropping rectangle, you must delete it in order to get this cursor. For stitched images, new cropping rectangles are drawn parallel to the average rise or fall in the image. To draw an ordinary crop rectangle, hold the ALT key (Windows) or OPTION key (Mac) key while this cursor is showing. For circular panoramas created with the Stitch 360 command (New image menu), the ends of the default crop region are set so that the lefthand and righthand edges of the cropped result will match seamlessly. To draw an ordinary crop rectangle, hold the ALT key (Windows) or OPTION key (Mac) key while this cursor is showing. |


top
Cropping circular panoramas
When you make a circular panorama with the Stitch 360 command (New image menu), the first image appears at both ends of the panorama. This gives you only a small amount of flexibility when using the cropping tool to compose your panorama. That is, the left and right ends of the image have to be within the repeated image if you want your final panorama to be a full 360 degrees.
If you want to frame the picture so that the ends are somewhere else or if you want your image to be significantly wider than 360 degrees, you can use the method described here.
Start by cropping the panorama using the default position of the cropping rectangle. That is, don't change the location or angle of the cropping rectangle. Just select the Crop command (New image menu) and approve it immediately.
Next, apply the Array command (New image menu) to the cropped image. Set Direction = Horizontal, Spacing = 0 and Repeat count = 2. This will create a new image with two copies of your picture end-to-end. That is, this image will be 720 degrees wide—two full revolutions.
Finally, apply the Crop command to the array image. This gives you full freedom to frame and crop the image anywhere you wish.
top
Perspective cropping
Most panoramic stitching applications, including The Panorama Factory, simulate the effect produced by rotational and swing-lens panoramic cameras. In images produced by these cameras straight lines appear to curve.
Planar panoramic cameras (6x17 etc) do not produce curved lines. However, planar panoramic cameras cannot capture as wide a view as rotational cameras. They are limited to about 120 degrees field of view.
You can use The Panorama Factory’s Perspective cropping to simulate the effect of a planar panoramic camera. With this cropping option, lines are straightened so that the cropped image has conventional perspective.
If you select this option when you crop a stitched panorama, The Panorama Factory displays a cropping region with a curved top and bottom.
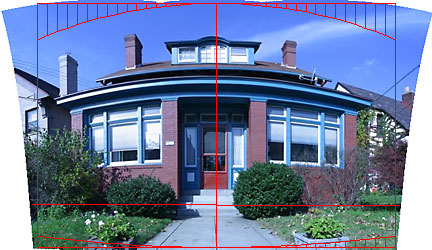
This curvature represents the correction that will be applied to convert from panoramic perspective to conventional perspective.
When you use Perspective cropping, the width and height of the cropping rectangle are limited in order to keep the horizontal and field of view under 135 degrees (plus or minus 67.5 degrees). Beyond about 120 degrees the image becomes extremely distorted and the size of the image increases rapidly.
The geometric accuracy of Perspective cropping is quite sensitive to the quality of the stitching. Hand held panoramas or panoramas that exhibit parallax errors are more likely to exhibit geometric distortion even after Perspective cropping is applied. You may find that manual stitching gives better results than semi-automatic or automatic stitching.
top
Approve
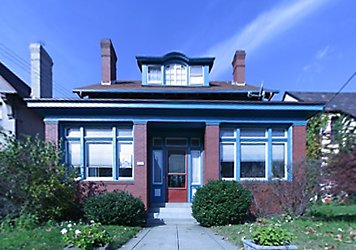
 When you have the cropping rectangle where you want it, use the Approve command (Image menu) to
generate the cropped image. The cropped image is added to the end of the
computed thumbnails list.
When you have the cropping rectangle where you want it, use the Approve command (Image menu) to
generate the cropped image. The cropped image is added to the end of the
computed thumbnails list.
If you want to change the cropping rectangle later, select the cropped image and use the Show source command (Image menu) to redisplay the cropping rectangle on the source image of the cropped result.
You’d hate to have to recompose the image if something went wrong. Save after you approve the cropped image.
top